Physical Address
You want your audience to listen to you present your information, instead of reading the screen. Use bullets or short sentences, and try to keep each item to one line.
How to Study Powerpoints (4 Quick Tips)
Powerpoint presentations. They’re long, they’re (sometimes) complicated and they’re not usually fun.
How to study powerpoints best?
Pre-study them first. Ask active questions about the information on the slides. Make quick (but short) flashcards from the key concepts.
Med school leans on powerpoint presentations a lot!
For students wondering how best to deal with them, this article is for you.
- Useful ways to make passive slide reading more active
- How can you save time having to cover the material in multiple passes
- The tips I used to survive heavy powerpoint content
Having spent the last four years in powerpoint hell, I’ve come up with a few ideas!
Let’s get started.
How To Study Powerpoints
1. Pre-Study Powerpoints
One of the most effective ways to prepare for lectures and increase your chances of staying awake is to pre-study them beforehand.
Doing this helps you contextualize information better. As you’ve already seen the start and end points, you know exactly where the presentation is going.
Here’s how you can best do this:
- Skim over the slides for a quick first pass (don’t worry about understanding at this stage)
- Force yourself to come up with 5-10 main questions based on what you’ve read. Things like:
- Why is this information relevant to X?
- What is meant by X or Y terms?
- Why is understanding this beneficial?
Of course you don’t have to only do this in lectures either.
If you choose not to go to lectures (don’t worry, many med students don’t), you can switch point three (listening) to reading instead.
The main point is that you try and answer the questions during a deeper second pass.
This is similar to a couple of tips shared by med student redditors in my article; How To Study In Med School: Reddit’s 26 Best Tips.
2. Actively Review Slides: Ask Questions
Reading or listening to powerpoint presentations is very passive. I know when I first started med school I was surprised by just how dull and ineffective this mode of learning could be.
That’s why I’m a big champion of evidence-based study strategies like active recall!
You can apply active recall to powerpoints by writing questions instead of notes on the slides. Then you can finish up by collecting these questions and putting them into a spreadsheet or something similar. And finally periodically quiz yourself on the answers.
This is probably best done with note-taking apps like Notability or OneNote.
If you use a tablet or iPad in med school, you can import the slides and write these questions directly beneath them.
Janice Studies has a really good guide on digital note taking in this video…
I did a lot of this in the preclinical years of study!
3. Turn Lecture Slides Directly Into Flashcards
Another great way to get more active when studying powerpoints or slides is to convert them directly into flashcards.
There are lots of ways to do this but my preferred method is using digital flashcard apps like anki.
A few things to be aware of:
- Set a target number of flashcards per lecture (don’t turn every bullet point into a flashcard – that’s just overkill – aim for something like 2 cards per slide)
- Check if there are any pre-made decks that cover the major points already (helps if you’ve pre-studied the slides first)
- Use cloze (fill-in-the-gap) formats or the image occlusion add-on to make your cards faster to recall (don’t jam a load of endless facts on them)
This last point is why I love zanki so much. Check out my article: What Is The Best Anki Deck For Step 1 to learn more about that.
This video from Prerak Juthani is very similar to how I’d recommend doing it…
Having your powerpoints converted this way will ensure you memorize them effectively.
Just remember to keep up with the reviews!
4. Summarize In Your Own Words
Summarizing the information on slides into your own words is a powerful technique that can help you understand and recall the information better.
Here are a few ways of doing this effectively:
- Condense the information: force yourself to select the most high yield information that’s worth memorizing.
- Once put into your own words, try recalling it without help: you could use concept maps on whiteboards to help here. Whenever you get stuck go back to your summary, review and repeat the process.
- Teach someone else the concept: explain it to a friend, colleague or say aloud without a reference guide to prove you’ve really understood it.
Each of these are strong active recall strategies that can help turn passive powerpoint learning into something great.
Bonus: Forget The Powerpoints
This last tip is something a little extra.
Perhaps it’s best to forget the powerpoints completely.
Why not pick up a high-yield review book instead?
I decided to do this after my first year in med school and I never looked back. Using UFAPS and resources like Boards and Beyond to learn the material during the first pass, I saved a lot of time and effort and my grades weren’t impacted either.
Note: If you’re not a med student, just Google “best review books for X”. X being your topic of study!
Just remember to skim the lectures before major exams though to make sure you cover the details your school’s internal exams love to test on.
Summary
Powerpoints are many professor’s best friend. Instead of getting bogged down with them, work out how to use them to your advantage.
Hopefully the tips above can help show you how.
If you liked this article, you might find the following articles useful:
Basic tasks for creating a PowerPoint presentation
PowerPoint presentations work like slide shows. To convey a message or a story, you break it down into slides. Think of each slide as a blank canvas for the pictures and words that help you tell your story.
Choose a theme
When you open PowerPoint, you’ll see some built-in themes and templates. A theme is a slide design that contains matching colors, fonts, and special effects like shadows, reflections, and more.

- On the File tab of the Ribbon, select New, and then choose a theme. PowerPoint shows you a preview of the theme, with four color variations to choose from on the right side.
- Click Create, or pick a color variation and then click Create.
Insert a new slide

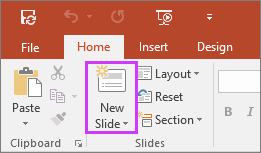
- On the Home tab, click the bottom half of New Slide, and pick a slide layout.
Save your presentation
- On the File tab, choose Save.
- Pick or browse to a folder.
- In the File name box, type a name for your presentation, and then choose Save.
Note: If you frequently save files to a certain folder, you can ‘pin’ the path so that it is always available (as shown below).

Tip: Save your work as you go. Press Ctrl+S often or save the file to OneDrive and let AutoSave take care of it for you.
Add text
Select a text placeholder, and begin typing.

Format your text

- Select the text.
- Under Drawing Tools, choose Format.
- Do one of the following:
- To change the color of your text, choose Text Fill, and then choose a color.
- To change the outline color of your text, choose Text Outline, and then choose a color.
- To apply a shadow, reflection, glow, bevel, 3-D rotation, a transform, choose Text Effects, and then choose the effect you want.
Add pictures
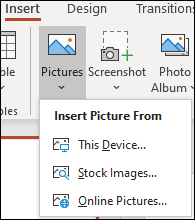
On the Insert tab, select Pictures, then do one of the following:

- To insert a picture that is saved on your local drive or an internal server, choose This Device, browse for the picture, and then choose Insert.
- (For Microsoft 365 subscribers) To insert a picture from our library, choose Stock Images, browse for a picture, select it and choose Insert.
- To insert a picture from the web, choose Online Pictures, and use the search box to find a picture. Choose a picture, and then click Insert.
Add shapes
You can add shapes to illustrate your slide.

- On the Insert tab, select Shapes, and then select a shape from the menu that appears.
- In the slide area, click and drag to draw the shape.
- Select the Format or Shape Format tab on the ribbon. Open the Shape Styles gallery to quickly add a color and style (including shading) to the selected shape.
Add speaker notes
Slides are best when you don’t cram in too much information. You can put helpful facts and notes in the speaker notes, and refer to them as you present.
- To open the notes pane, at the bottom of the window, click Notes
 .
. - Click inside the Notes pane below the slide, and begin typing your notes.

Give your presentation
On the Slide Show tab, do one of the following:

- To start the presentation at the first slide, in the Start Slide Show group, click From Beginning.
- If you’re not at the first slide and want to start from where you are, click From Current Slide.
- If you need to present to people who are not where you are, click Present Online to set up a presentation on the web, and then choose one of the following options:
- Broadcast your PowerPoint presentation online to a remote audience
- View your speaker notes as you deliver your slide show.
Get out of Slide Show view
To get out of Slide Show view at any time, on the keyboard, press Esc.
Choose a theme
You can quickly apply a theme when you’re starting a new presentation:

- On the File tab, click New.
- Select a theme.
Insert a new slide
- In the slide thumbnail pane on the left, select the slide that you want your new slide to follow.
- On the Home tab, select the lower half of New Slide.
- From the menu, select the layout that you want for your new slide. Your new slide is inserted, and you can click inside a placeholder to begin adding content. Learn more about slide layouts
Save your presentation
PowerPoint for the web automatically saves your work to your OneDrive, in the cloud.
To change the name of the automatically saved file:
- In the title bar, click the file name.
- In the File Name box, enter the name you want to apply to the file.
- If you want to change the cloud storage location, at the right end of the Location box, click the arrow symbol, then navigate to the folder you want, then select Move here.
Add text
Select a text placeholder, and begin typing.

Format your text
- Select the text.
- On the Home tab, use the Font options:
- Do one of the following:
- To change the color of your text, select
 Font Color, and then choose a color.
 - To incrementally change the size of text, select Increase Font Size or Decrease Font Size

- Select from other formatting options such as Bold, Italic, Underline, Strikethrough, Subscript, and Superscript.
- To change the color of your text, select
Add pictures

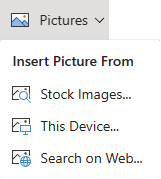
- On the Insert tab, select Pictures.
- From the menu, select where you want to insert the picture from:
- Browse to the image you want, select it, then select Insert. After the image is inserted on the slide, you can select it and drag to reposition it, and you can select and drag a corner handle to resize the image.
Add shapes

- On the Insert tab, select Shapes, and then select a shape from the menu that appears.
- On the slide canvas, click and drag to draw the shape.
- Select the Shape tab on the ribbon. Open the Shape Styles gallery to quickly add a color and style (including shading) to the selected shape.
Add speaker notes
- On the View tab, select Notes
 . A horizontal Notes pane appears at the bottom of the window, below the slide.
 - Click in the pane, then enter text. The Notes pane can be made larger, if necessary. When you point at the top border of the pane, the mouse pointer becomes a two-headed arrow
 . Click the border, then drag up or down to resize the pane.
Give your presentation

- On the Slide Show tab, select Play From Beginning.
- To navigate through the slides, simply click the mouse or press the spacebar.
Tip: You can also use the forward and back arrow keys on your keyboard to navigate through the slide show.
Stop a slide show
- To get out of Slide Show view at any time, on the keyboard, press Esc. The full-screen slide show will close, and you will be returned to the editing view of the file.
Tips for creating an effective presentation
Consider the following tips to keep your audience interested.
Minimize the number of slides
To maintain a clear message and to keep your audience attentive and interested, keep the number of slides in your presentation to a minimum.
Choose an audience-friendly font size
The audience must be able to read your slides from a distance. Generally speaking, a font size smaller than 30 might be too difficult for the audience to see.
Keep your slide text simple
You want your audience to listen to you present your information, instead of reading the screen. Use bullets or short sentences, and try to keep each item to one line.
Some projectors crop slides at the edges, so that long sentences might be cropped.
Use visuals to help express your message
Pictures, charts, graphs, and SmartArt graphics provide visual cues for your audience to remember. Add meaningful art to complement the text and messaging on your slides.
As with text, however, avoid including too many visual aids on your slide.
Make labels for charts and graphs understandable
Use only enough text to make label elements in a chart or graph comprehensible.
Apply subtle, consistent slide backgrounds
Choose an appealing, consistent template or theme that is not too eye-catching. You don’t want the background or design to detract from your message.
However, you also want to provide a contrast between the background color and text color. The built-in themes in PowerPoint set the contrast between a light background with dark colored text or dark background with light colored text.
For more information about how to use themes, see Apply a theme to add color and style to your presentation.
Check the spelling and grammar
To earn and maintain the respect of your audience, always check the spelling and grammar in your presentation.


